
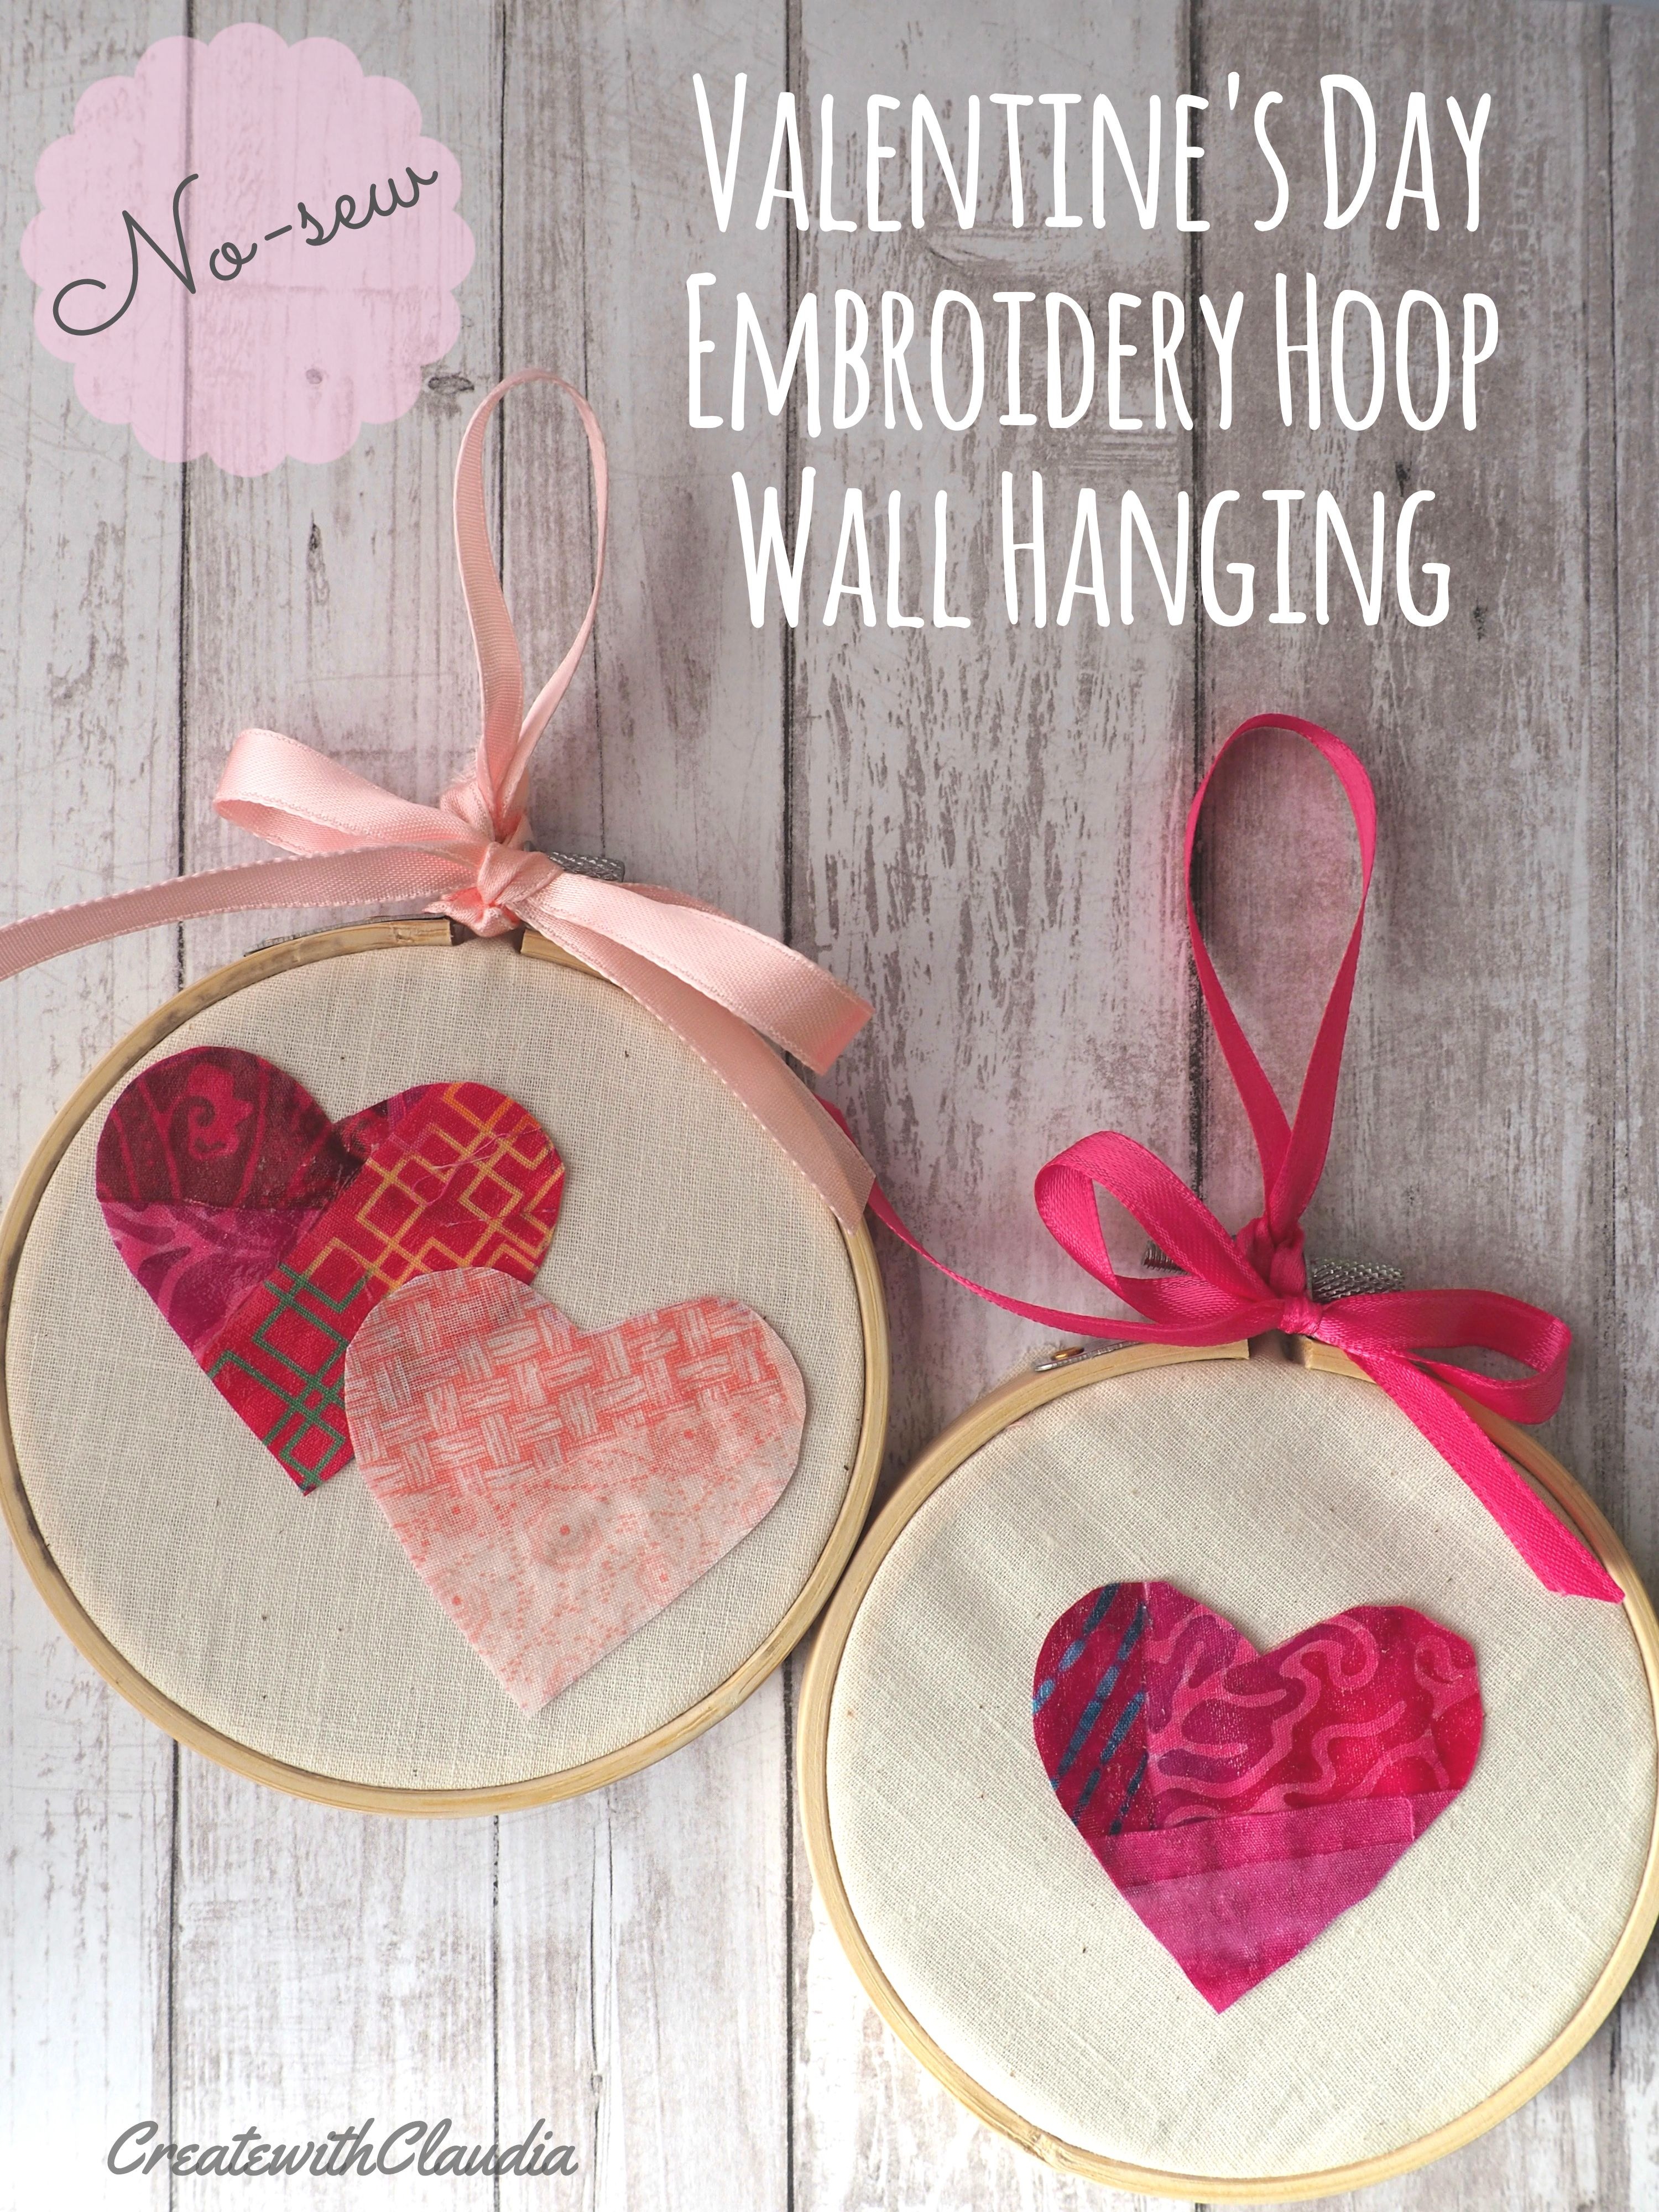
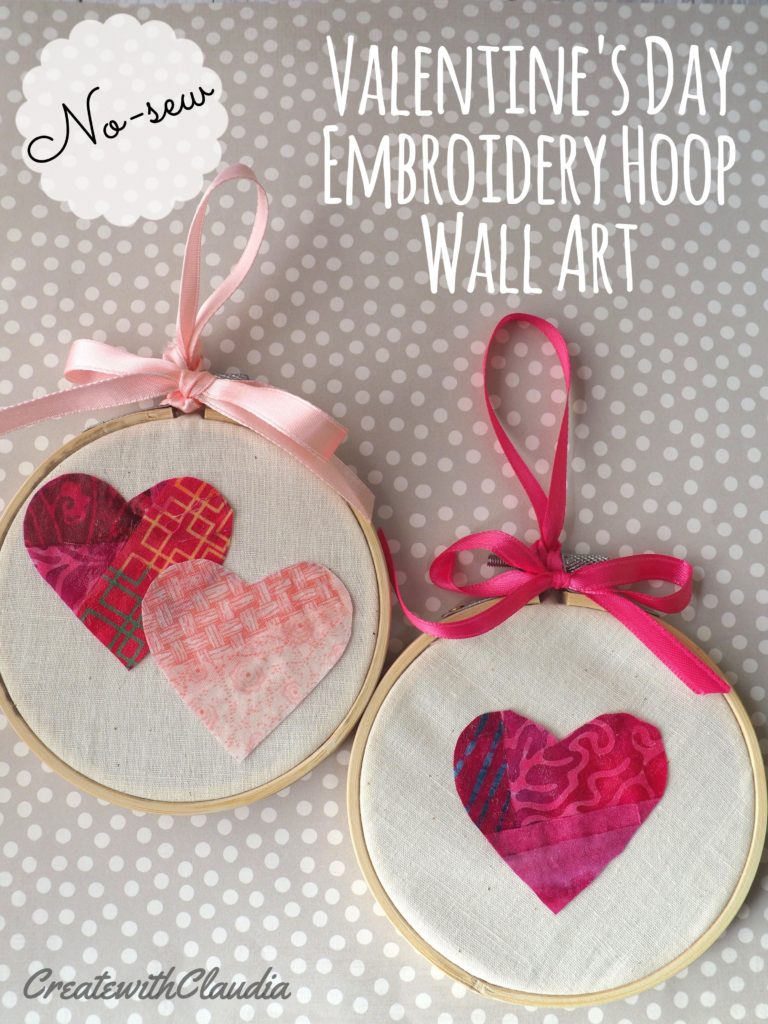
No-Sew Valentine’s Day Embroidery Hoop Patchwork Wall Hanging
Valentine’s Day, that one day a year that brings out the romantic in everyone, well maybe not everyone. For me, it brings out my crafty side. All those lovely shades of reds and pinks are just begging for a project.
So if this holiday makes you want to create something artistic, then this is the project for you.
This year is special for me because I just started my new blog, and this adorable no-sew Valentine’s Day embroidery hoop is my first post. It’s an easy way to decorate for the holiday that doesn’t break the bank, and looks good wherever you hang it.
I have become a fan of embroidery hoops because they can be transformed into anything. It’s easy to switch out inserts to correspond with particular occasions, and they come lots of sizes.
The bottom line is that they are super fun to work with. So let’s get started!
Supplies Needed
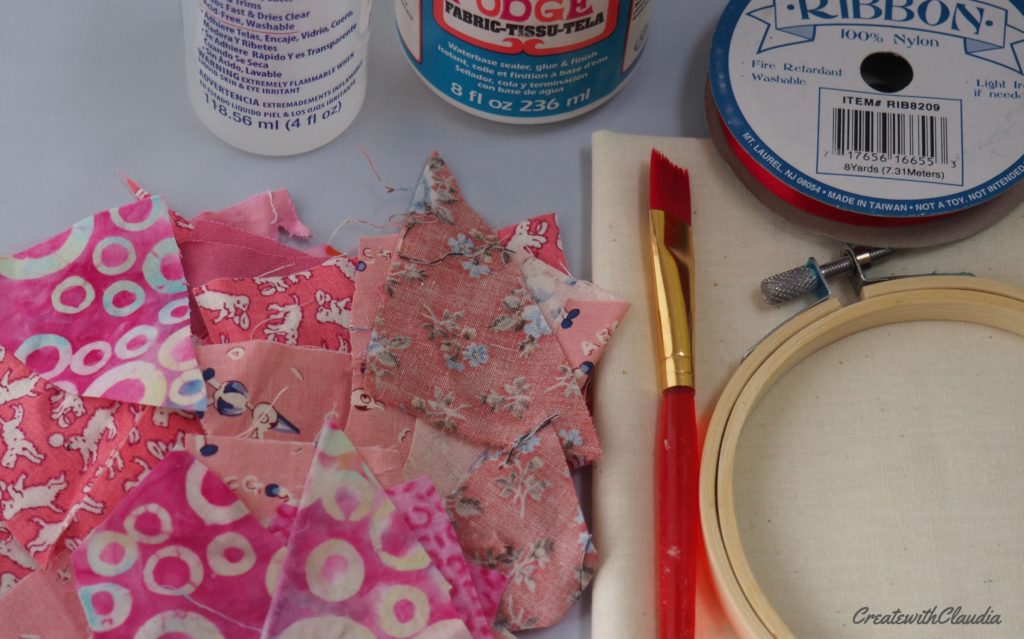
For this project you’ll need:
- 1 Embroidery hoop 4”
- Fabric Mod Podge
- Fabric glue
- 1 piece of muslin 10” square
- Pink and red fabric scraps in various shapes and sizes, none larger than about 2”
- Heart shaped template – I used a cookie cutter – You can also cut out the shape by hand if you prefer.
- Paint brush or sponge
- Wax paper
- Ribbon
- Gloves, hand wipes and paper towels (optional)
*Important: This is a messy project so be prepared. I like to have hand wipes and paper towels on hand, but if you don’t want to get Mod Podge all over your fingers then you’ll want to wear a pair of gloves. Also, fabric glue is strong stuff, so use it carefully and follow the directions on the container.
Items You Can Use To Make This Craft
You can find many of the items that I used to make this project in my Amazon Store.
As an Amazon Associate I earn from qualifying purchases.
Step 1: Making the Patchwork Fabric
I have loads of scrap fabrics that I’ve been trying to incorporate into projects for some time now, and this method of turning scraps into one large piece of fabric without sewing is a fun way to do that.
An added bonus is that you don’t even need to press the scraps for this. The Mod Podge flattens them out! Give me any project that doesn’t require ironing!
- Cover your work surface with a piece of wax paper. Have another piece set to the side to be used later.
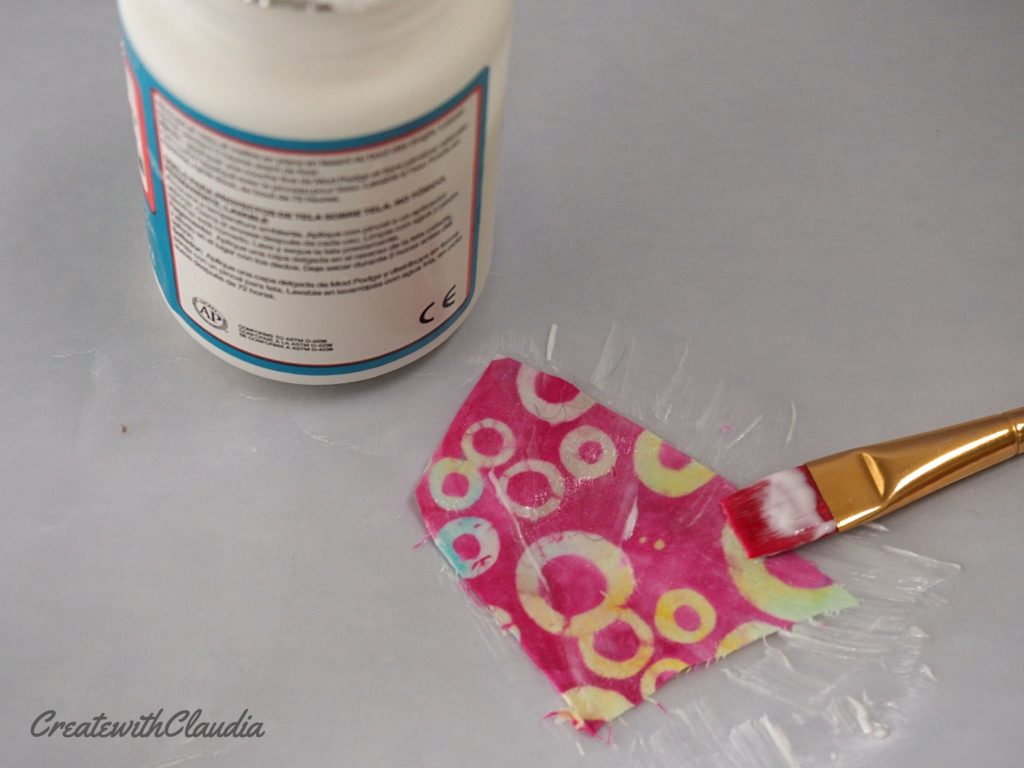
- Pick out your first piece of fabric, lay it on the paper, and start brushing a generous amount of Mod Podge onto it, covering the whole piece.
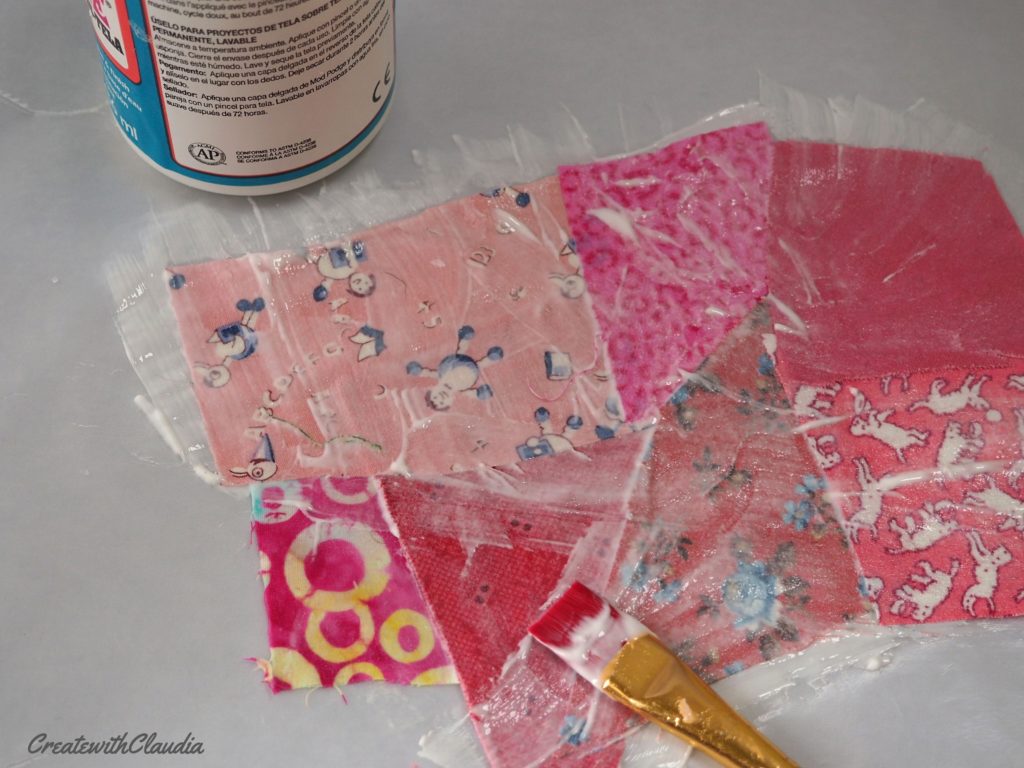
- Pick out another scrap, position it where you want it, making sure to overlap the other piece by at least 1/4”. Cover the piece with more Mod Podge. Hint: Carefully lift up the fabric every once in a while so it doesn’t get stuck to the wax paper.
- Continue adding fabric until you are happy with the size. Hint: Don’t make it too large or it will be difficult to remove from the paper.
- Once you are happy with the result, carefully peel off the fabric and flip it over.
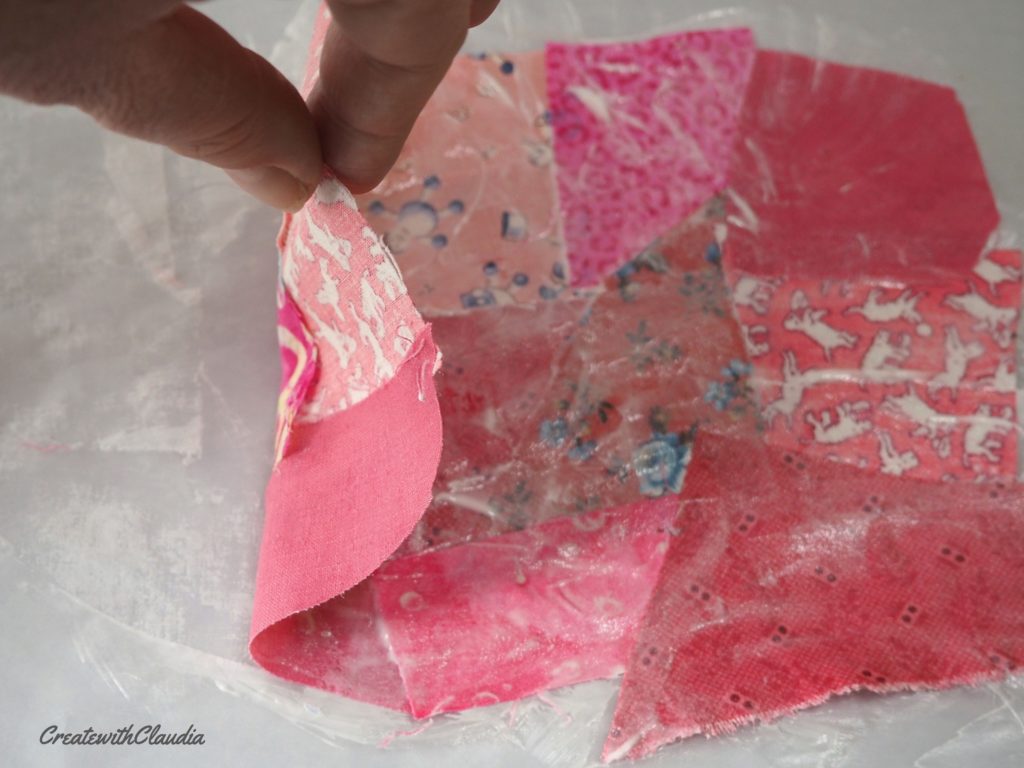
- Smooth it out and apply a light layer of Mod Podge to the back side.
- Transfer the entire piece to the other piece of unused wax paper to dry. After about 20 minutes, it will start to get tacky and you can flip it over to get air to the other side.
- Allow it to dry for a few hours, or overnight, flipping occasionally.
- Ta Dah! You have a piece of fabric made out of scraps.
For more information on making the fabric, I made this video of the entire process.
Step 2: Making the Decorative Wall Hanging
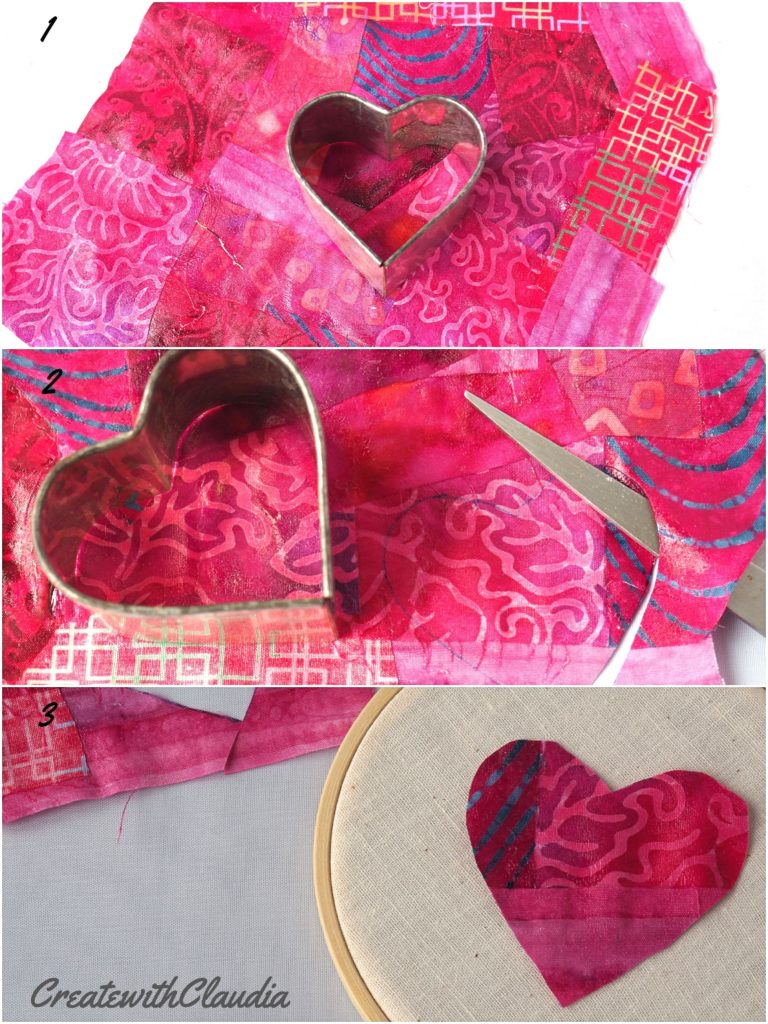
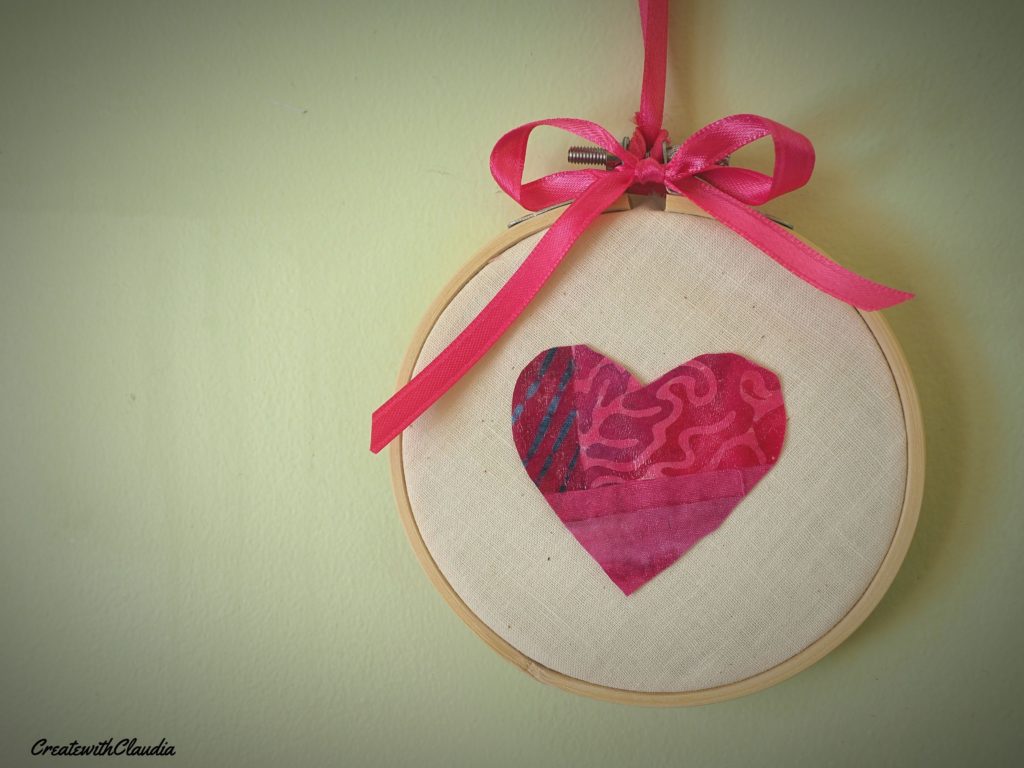
- Cut your heart shape out of the patchwork fabric you made earlier. The nice thing about using fabric Mod Podge is that is remains flexible and is easy to cut through, yet it’s incredibly strong, so your fabric pieces won’t come apart. I used a cookie cutter for this that is about 2” across at the widest point. You can use whatever method you’d like for your heart.
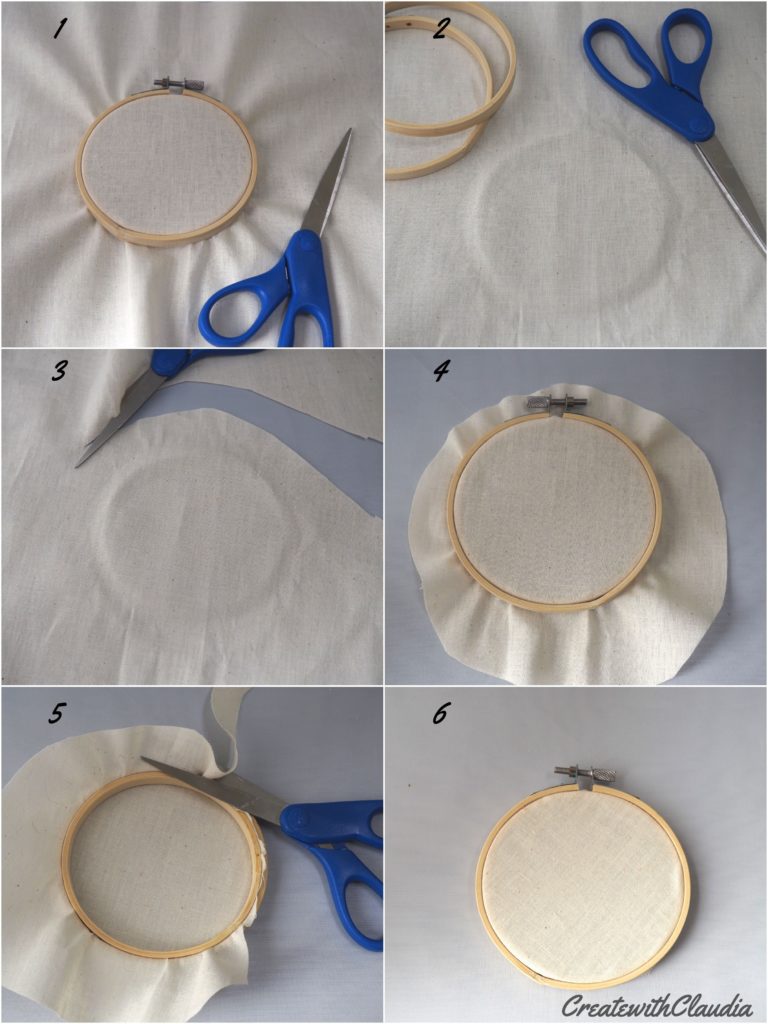
- Put your muslin into the embroidery hoop and tighten.
- Remove the muslin, and you will have an outline of the area that you have to work with.
- Trim around the outline, leaving a generous border of about 1″.
- Put the muslin back in the hoop and secure firmly.
- Carefully trim off the excess.
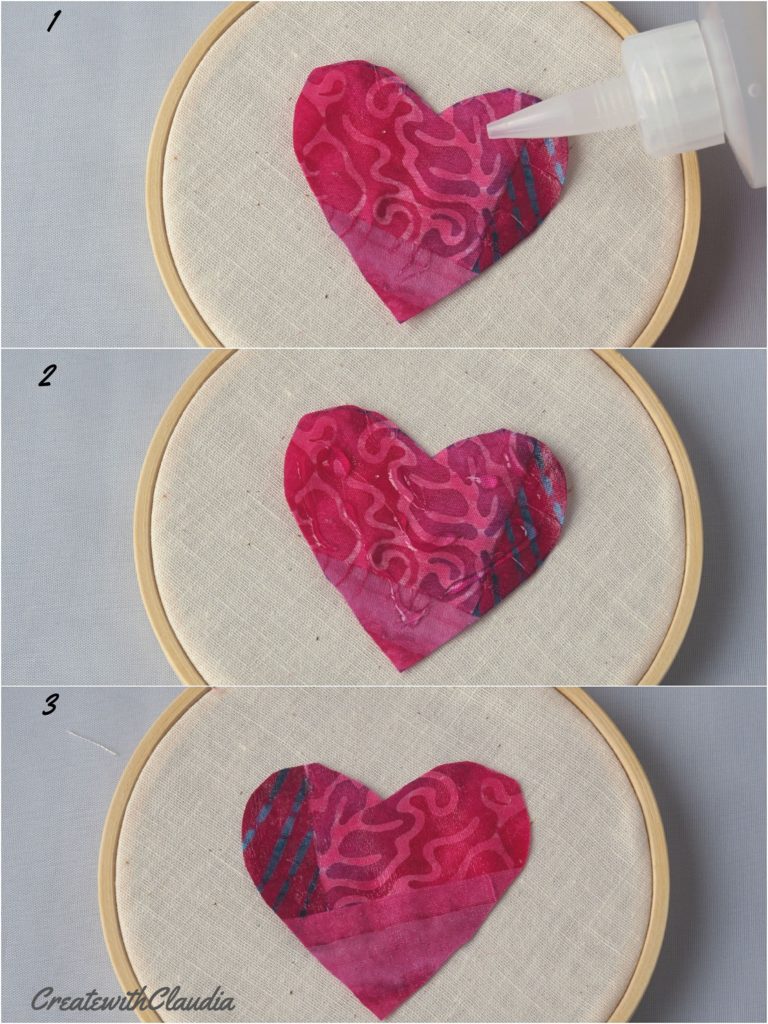
- Take the heart shape you cut out and position it the way you would like it to appear.
- Flip it over and put a few dabs of fabric glue around the outside, working quickly because the glue dries quickly.
- Flip the heart over and place it where you want it to go. Gently press, down, using care not to press the muslin.
- Set aside to dry for about one hour.
Step 3: Adding the Ribbon
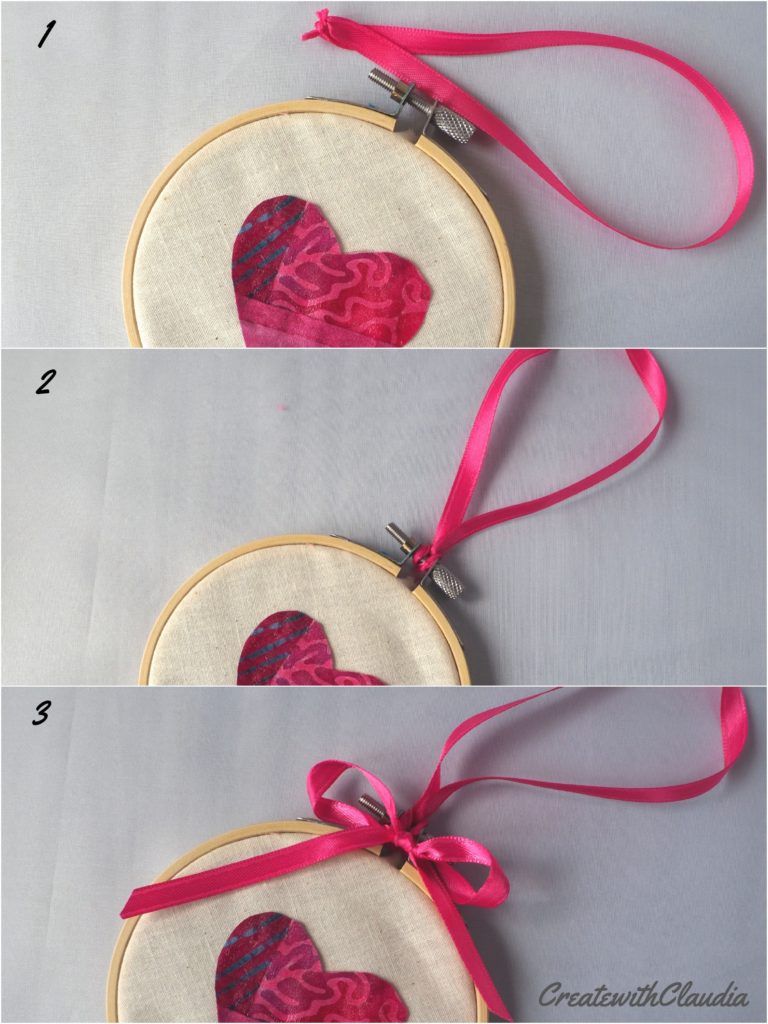
- Add a loop of ribbon to the top. I cut mine 6” long. Knot the ends tightly together. Feed one end of the loop under the screw of the hoop and then feed it through other end of the loop. The drop ends up being about 2 to 2 1/2”.
- Add a decorative ribbon bow to the top.
- You are done!

Just a few steps and you have a darling Valentine’s Day craft that would make a great decoration in your house, or a thoughtful gift for a friend.
I hope I have inspired you to raid your scrap stash, make some Mod Podge fabric, and create some fun and festive art work.

9 Comments
Mother of 3
February 11, 2019 at 9:05 PMThat is so cute and I just love that it’s “no- sew.” Thanks so much for sharing with us at Share Some Love. Pinned.
createwithclaudia_7j76hs
February 12, 2019 at 1:31 AMThank you for stopping by. I’m glad you enjoyed the project.
Marci
February 12, 2019 at 11:38 AMI just adore those little patchwork hearts! Thank you for the step by step directions with photos. Your post will be one of my features for “Share Some Love” link party . pinning -Marci @ Stone Cottage Adventures
createwithclaudia_7j76hs
February 12, 2019 at 11:58 AMThank you so much Marci! I appreciate the support and I’m going to check it out.
Gail
February 12, 2019 at 3:14 PMI’m jumping on the bandwagon, too, Claudia! Congrats on your new blog and sharing this adorable Valentine’s project with us on Share Some Love Link Party. What a wonderful way to start a new blog! I’m featuring your lovely creation tomorrow, and perhaps some of my co-hosts besides Marci and me will too! It’s so cute and adorable!
createwithclaudia_7j76hs
February 12, 2019 at 3:43 PMThank you Gail. I really appreciate the support.
createwithclaudia_7j76hs
February 13, 2019 at 12:50 PMThanks for including my project in the link party!
Marcia Carvalho
February 13, 2019 at 6:59 PMSo cute! Thank you!! xoxo
createwithclaudia_7j76hs
February 13, 2019 at 7:54 PMThanks so much! I appreciate it.